- Published on
Start contributing to Open Source projects
- Authors

- Name
- Leonard Vincent Simon Pahlke
- @leonardpahlke
Many projects that shape today's software industry are developed as open source software, such as the Linux Kernel, React, Golang, Kubernetes, and vscode. Because open source is open, transparent, and developed by diverse communities, everyone has the opportunity to contribute and get involved. But what do contributions look like and how to get started? Let's take a look.
Open Source Contributions
If you've already contributed to an open source project, you've probably written code or updated something in the documentation. Those two types of contributions were my introduction to open source, and I suspect it's the same for most folks. Working on code or documentation is only one of the ways to contribute.
What other contributions you can make depends on the project you want to contribute to. If you are starting a new project that is essentially developed only by you, there is no need to define community structures or anything like that. In this case, there are most likely just code and documentation contributions. If several people are working on the code base from time to time, you will also need to run/maintain the open source project and perhaps host a website or something similar. With this, additional contributions need to be made. For an even larger project with dozens of changes made every day, many more structures are required. In this case, you will need to set guidelines for how the community works, and also set up meetings or other communication channels.
In the diagram below, you can see some of the types of contributions. The diagram shows that as the community grows, more and more work needs to be done to make the project a success.
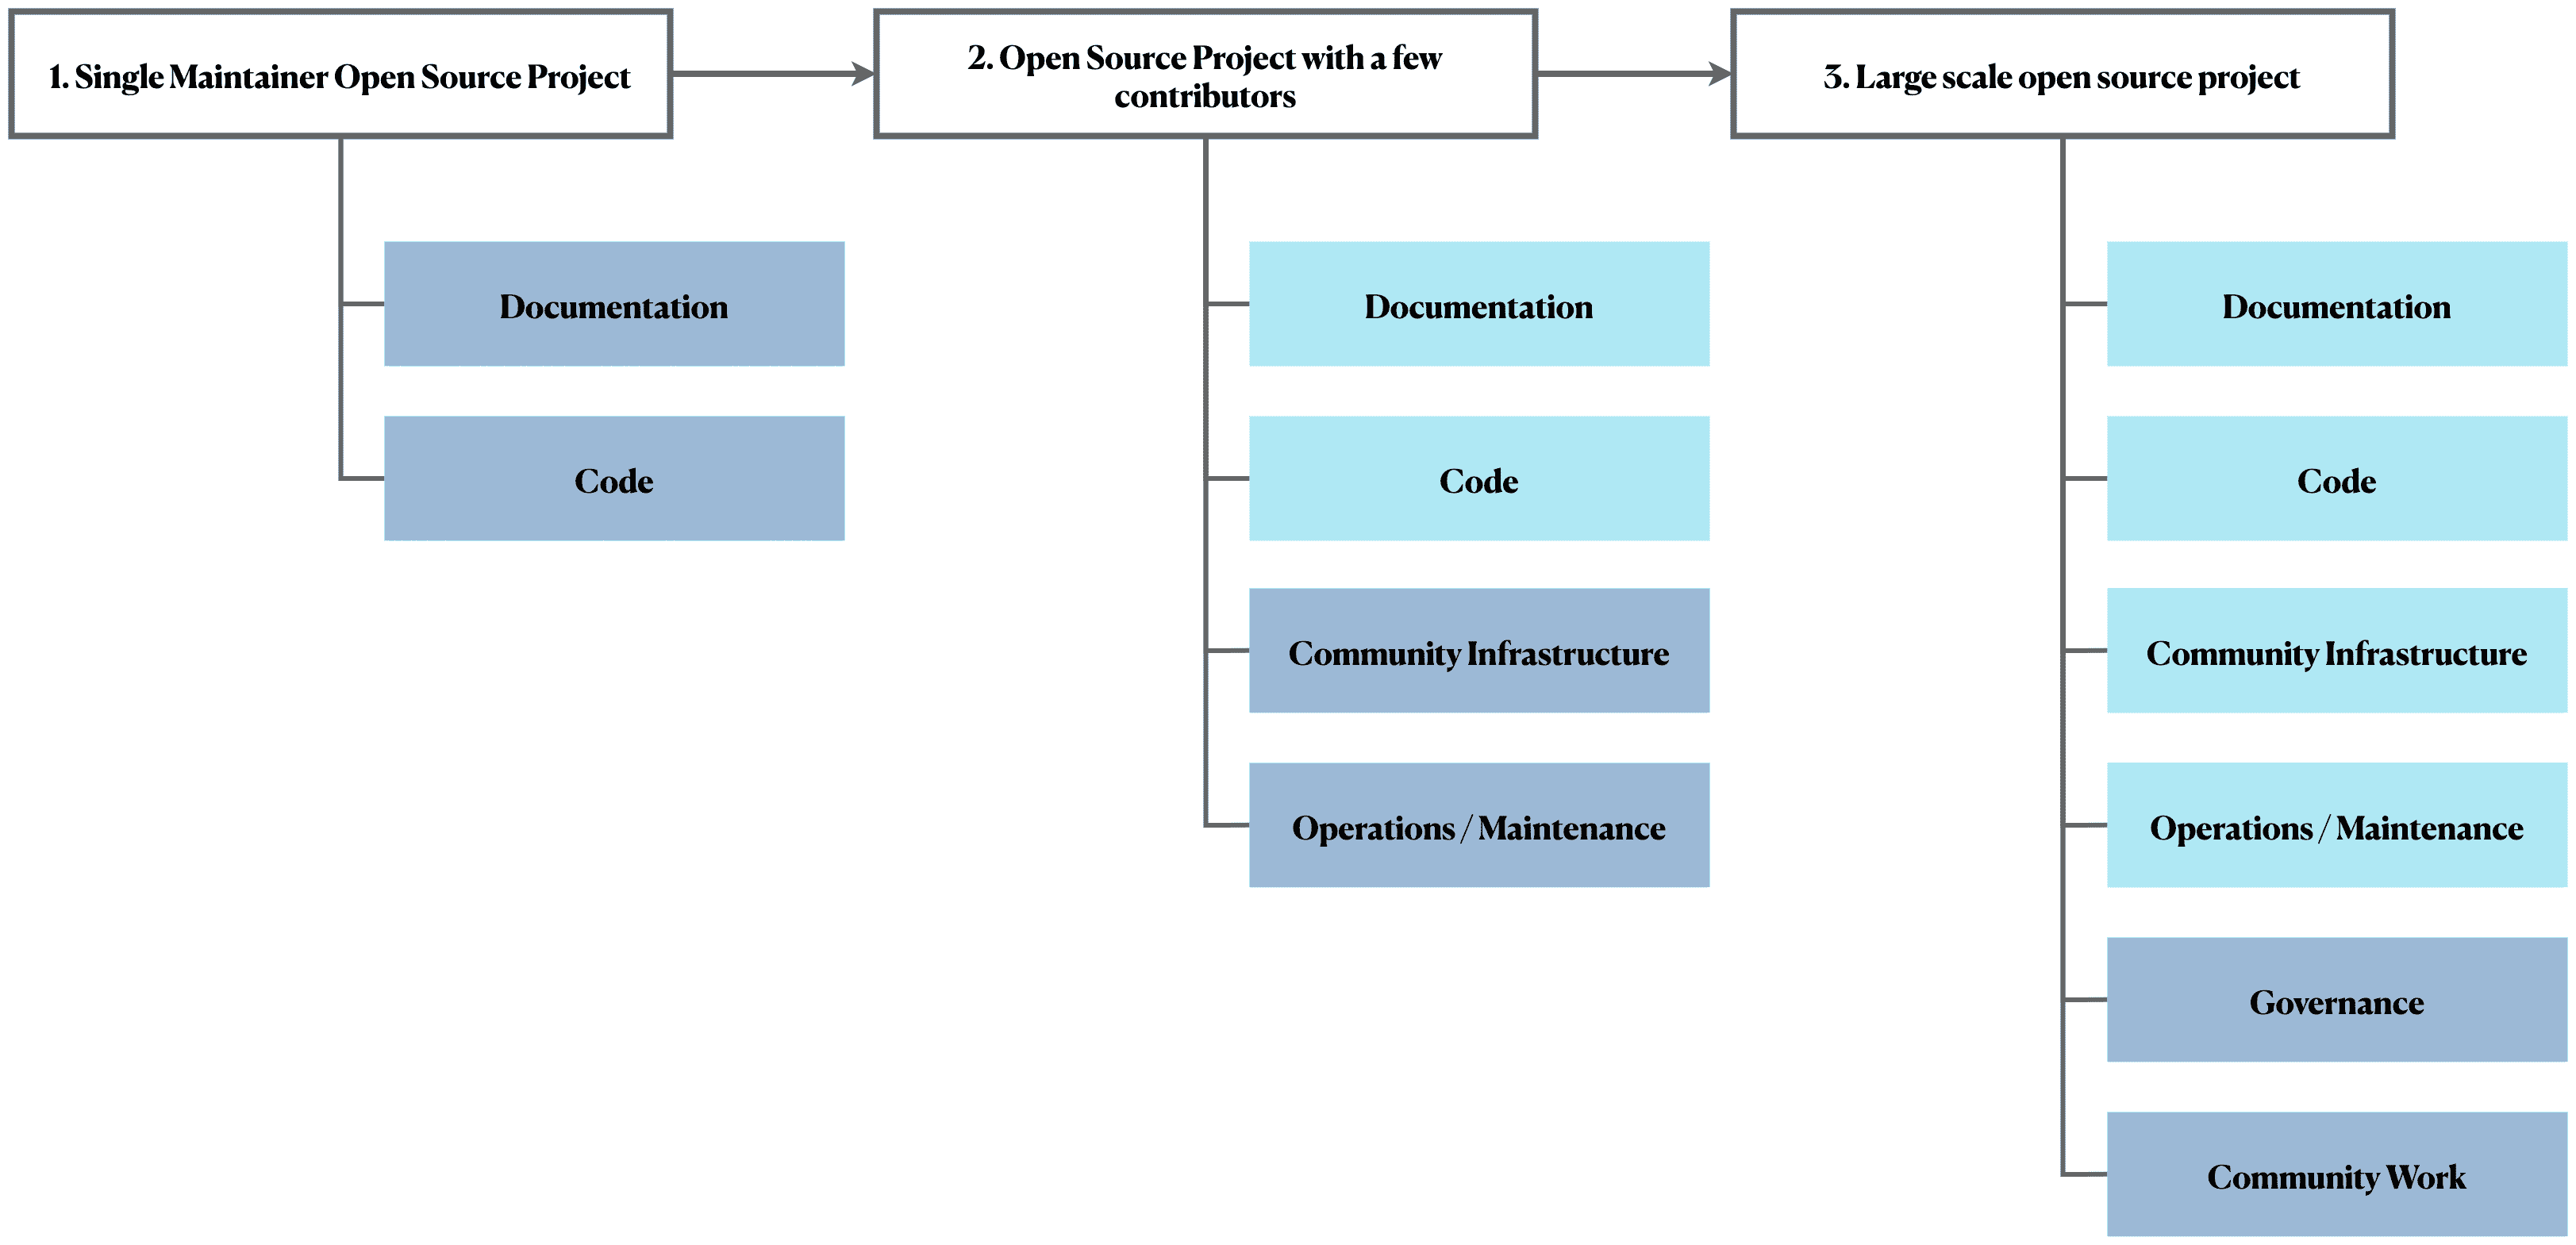
- Documentation: a common way to contribute to open source projects is to write instructions on how to use the software, what recent changes have been made, or how to get involved.
- Code: Adding new features, updating dependencies, or refactoring code is usually the most common way to contribute.
- Community Infrastructure: Managing the community infrastructure often involves a CI/CD system, a website, and sometimes other infrastructure to manage container images or run project-specific tools. The infrastructure is very manageable for small projects, but can become very confusing for larger projects and is rarely considered when coming into contact with an open source project.
- Operations/Maintenance: Creating issues, commenting on issues or pull requests, or expanding the domain of the project website, or even pinging people to respond to reviews are all examples of operations/maintenance tasks.
- Governance: defining rules, processes, and the framework for collaboration are important guidelines as the number of people in the open source project grows. At a certain size it is no longer possible to bridge the gap, so setting guidelines and defining them in processes is an important involvement.
- Community work: investing time to grow the community and help everyone work together better may not be something you expected right away, but this work is essential if the project wants to bring more and more people together. After a certain size, other open source projects build on your work. Understanding the responsibilities and making sure the work can continue even if someone leaves from the core developers is critical to building a trustworthy project.
The following diagram shows some common examples of contributions you can make.
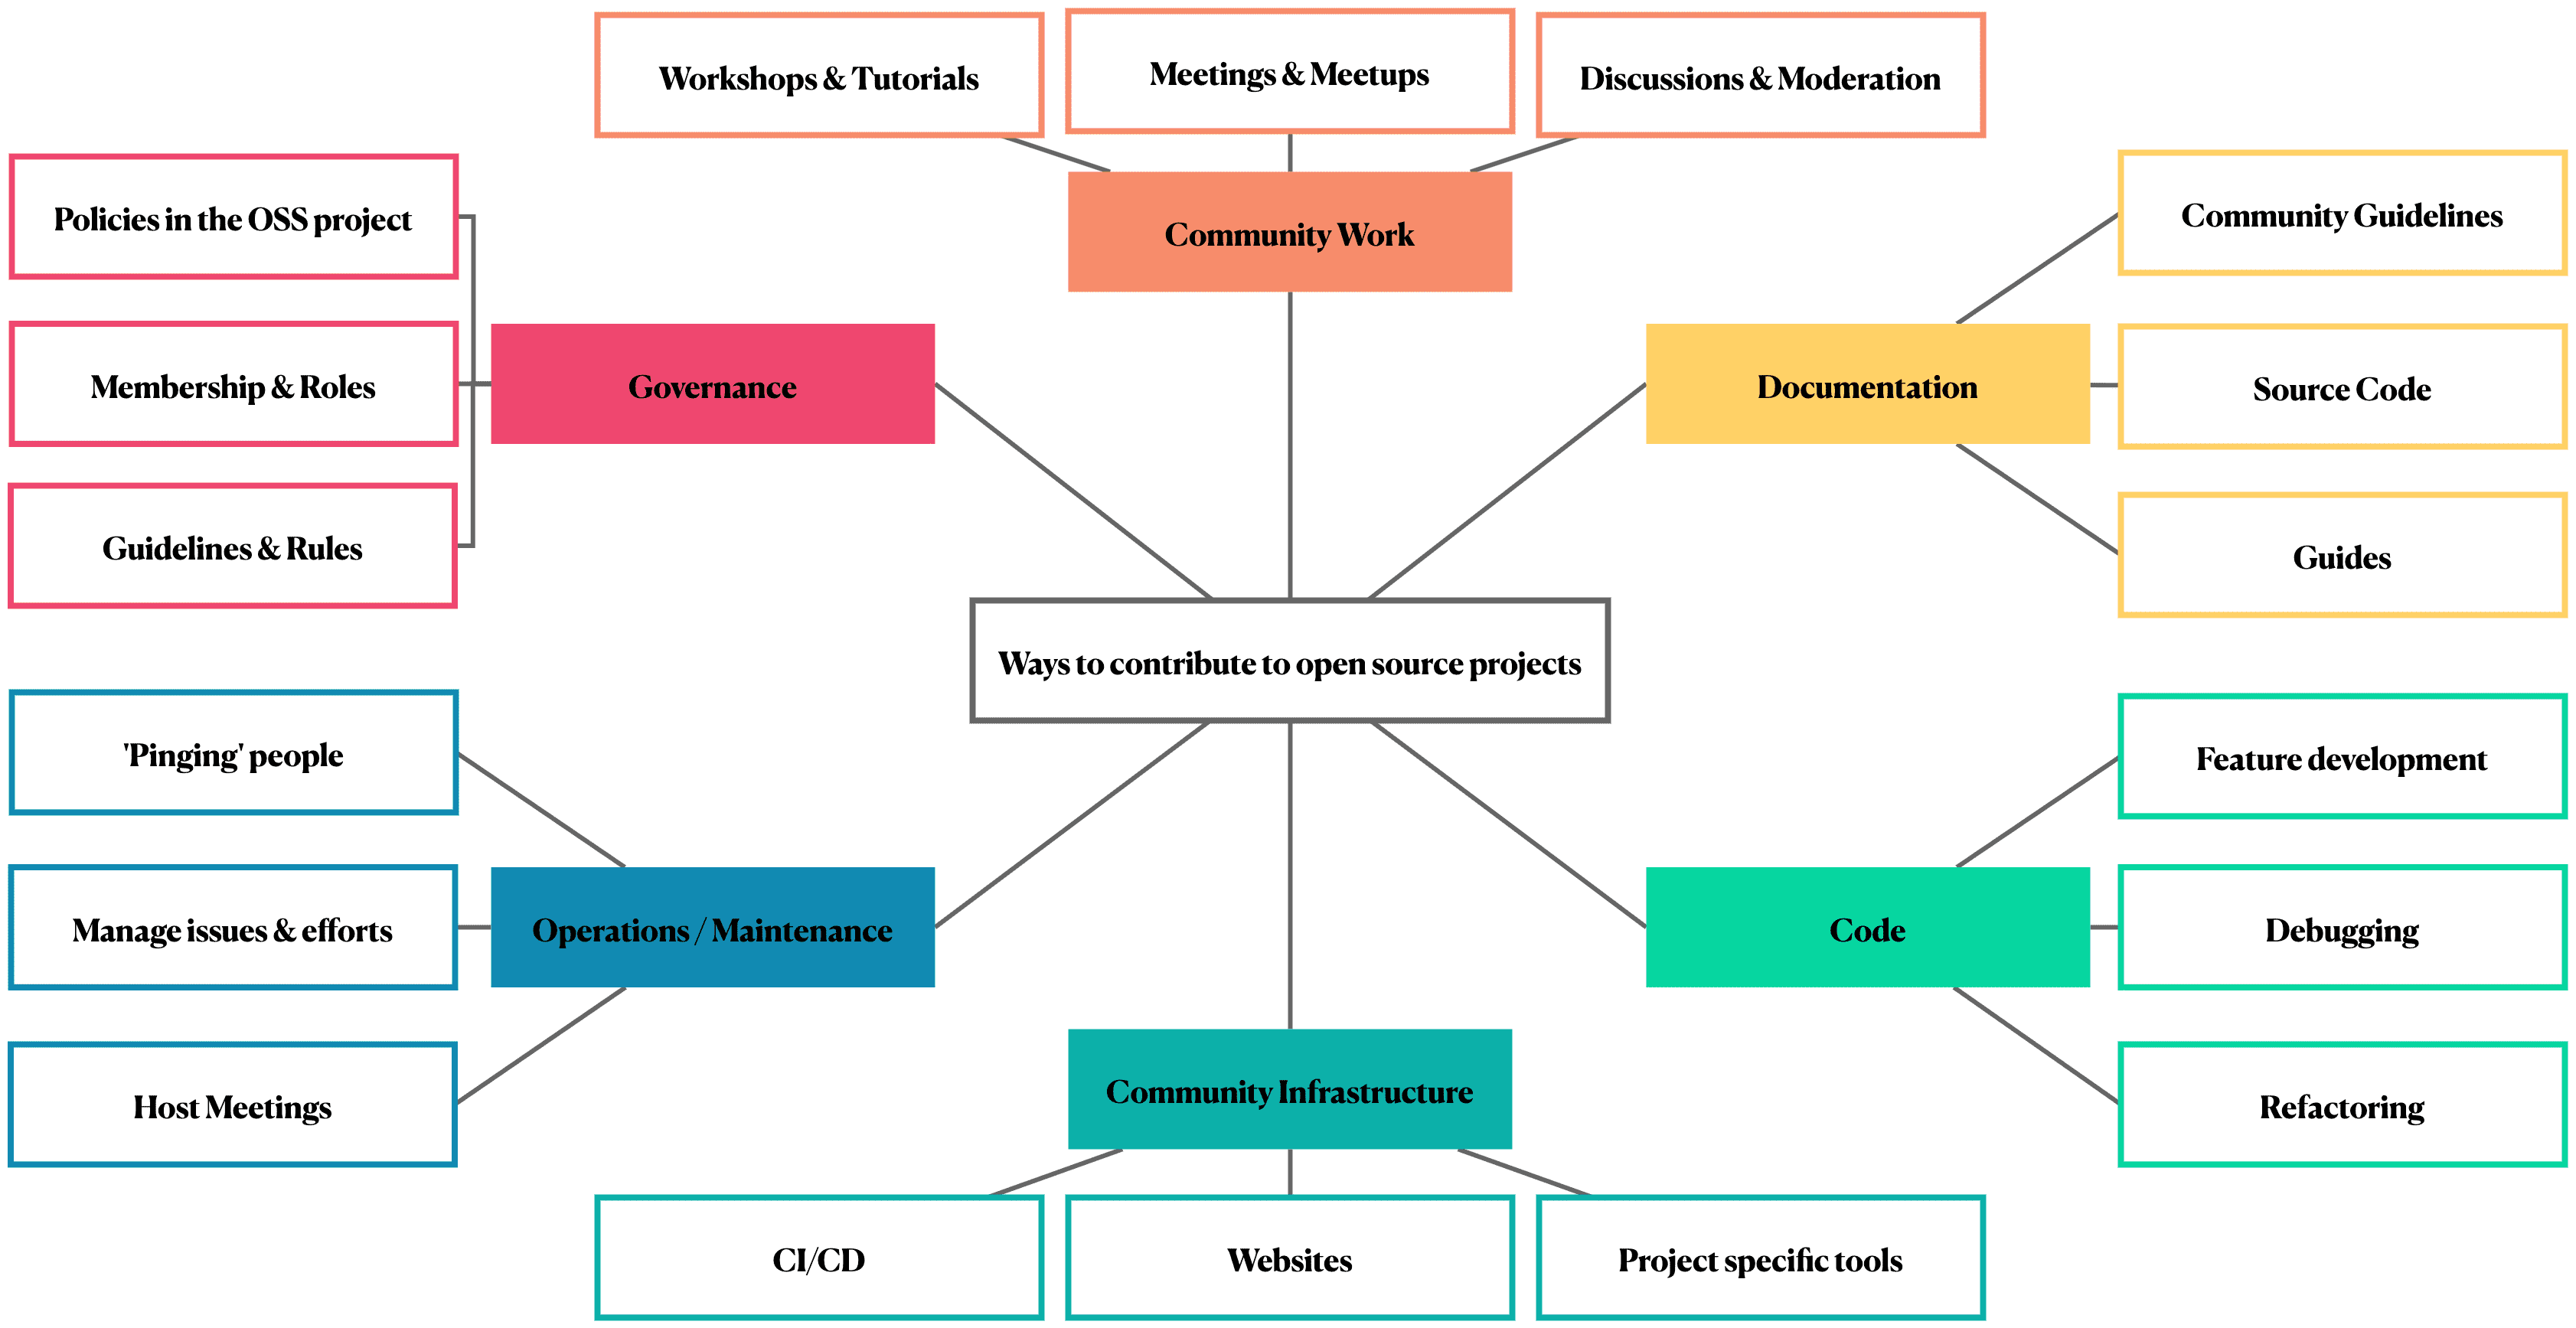
Most contributions are based on changes to the code repository, but not everything is tracked by commits. Since posts about writing comments in issues or pinging people are not that interesting, we focus on the work done by commits.
How to make your first code contribution
You probably already have something in mind that you'd like to work on. Maybe it's a bug you noticed, or a missing feature, or something else that caught your attention. If that's the case, that's great, if not, there are a few things you can do to find your contribution.
- Labels: Most projects use Issues to track efforts, and Labels to organize and improve filtering, etc., issues with labels like: good first issue and help needed are a good thing to consider and "kind-of" labels like enhancement, documentation or bug can help too if you want to be more selective about your contribution. Note that labels change by open source project so you might see the label feature and not the label enhancement and so on.
- Ask around in the community channels: For most major open source projects, there is a service that is used for discussion like Slack, Discord, Gitter etc. Join the channel, ask where you can support, and you are sure to be welcomed with open arms and get support to get started.
- Open Source Programs: Some organisations like the Linux Foundation also offer a mentorship program that puts you in direct contact with an open source contributor. Programs like Kubernetes Release Team Shadow are also an excellent start, as it was for me.
After you are good to go working on a contribution you should take a moment to look up in the documentation how the contribution guidelines are set for that particular open source project. Not every open source project defines this in the documentation, so you need to look for it. A good place to look for this kind of documentation is the README.md, which often describes this at the end of the document. If there is nothing there, projects sometimes create a CONTRIBUTING.md file that contains this kind of information, you will almost always find this document in larger projects with a community that maintains the project. If you can't find anything, you're usually well advised to use the standard process I'm about to explain.
Contributing by editing a file or files in an open source project generally follows the path shown in the diagram below. If you are familiar with git and have worked on an open source project before, you may already be familiar with this section, so skip to the next section :).
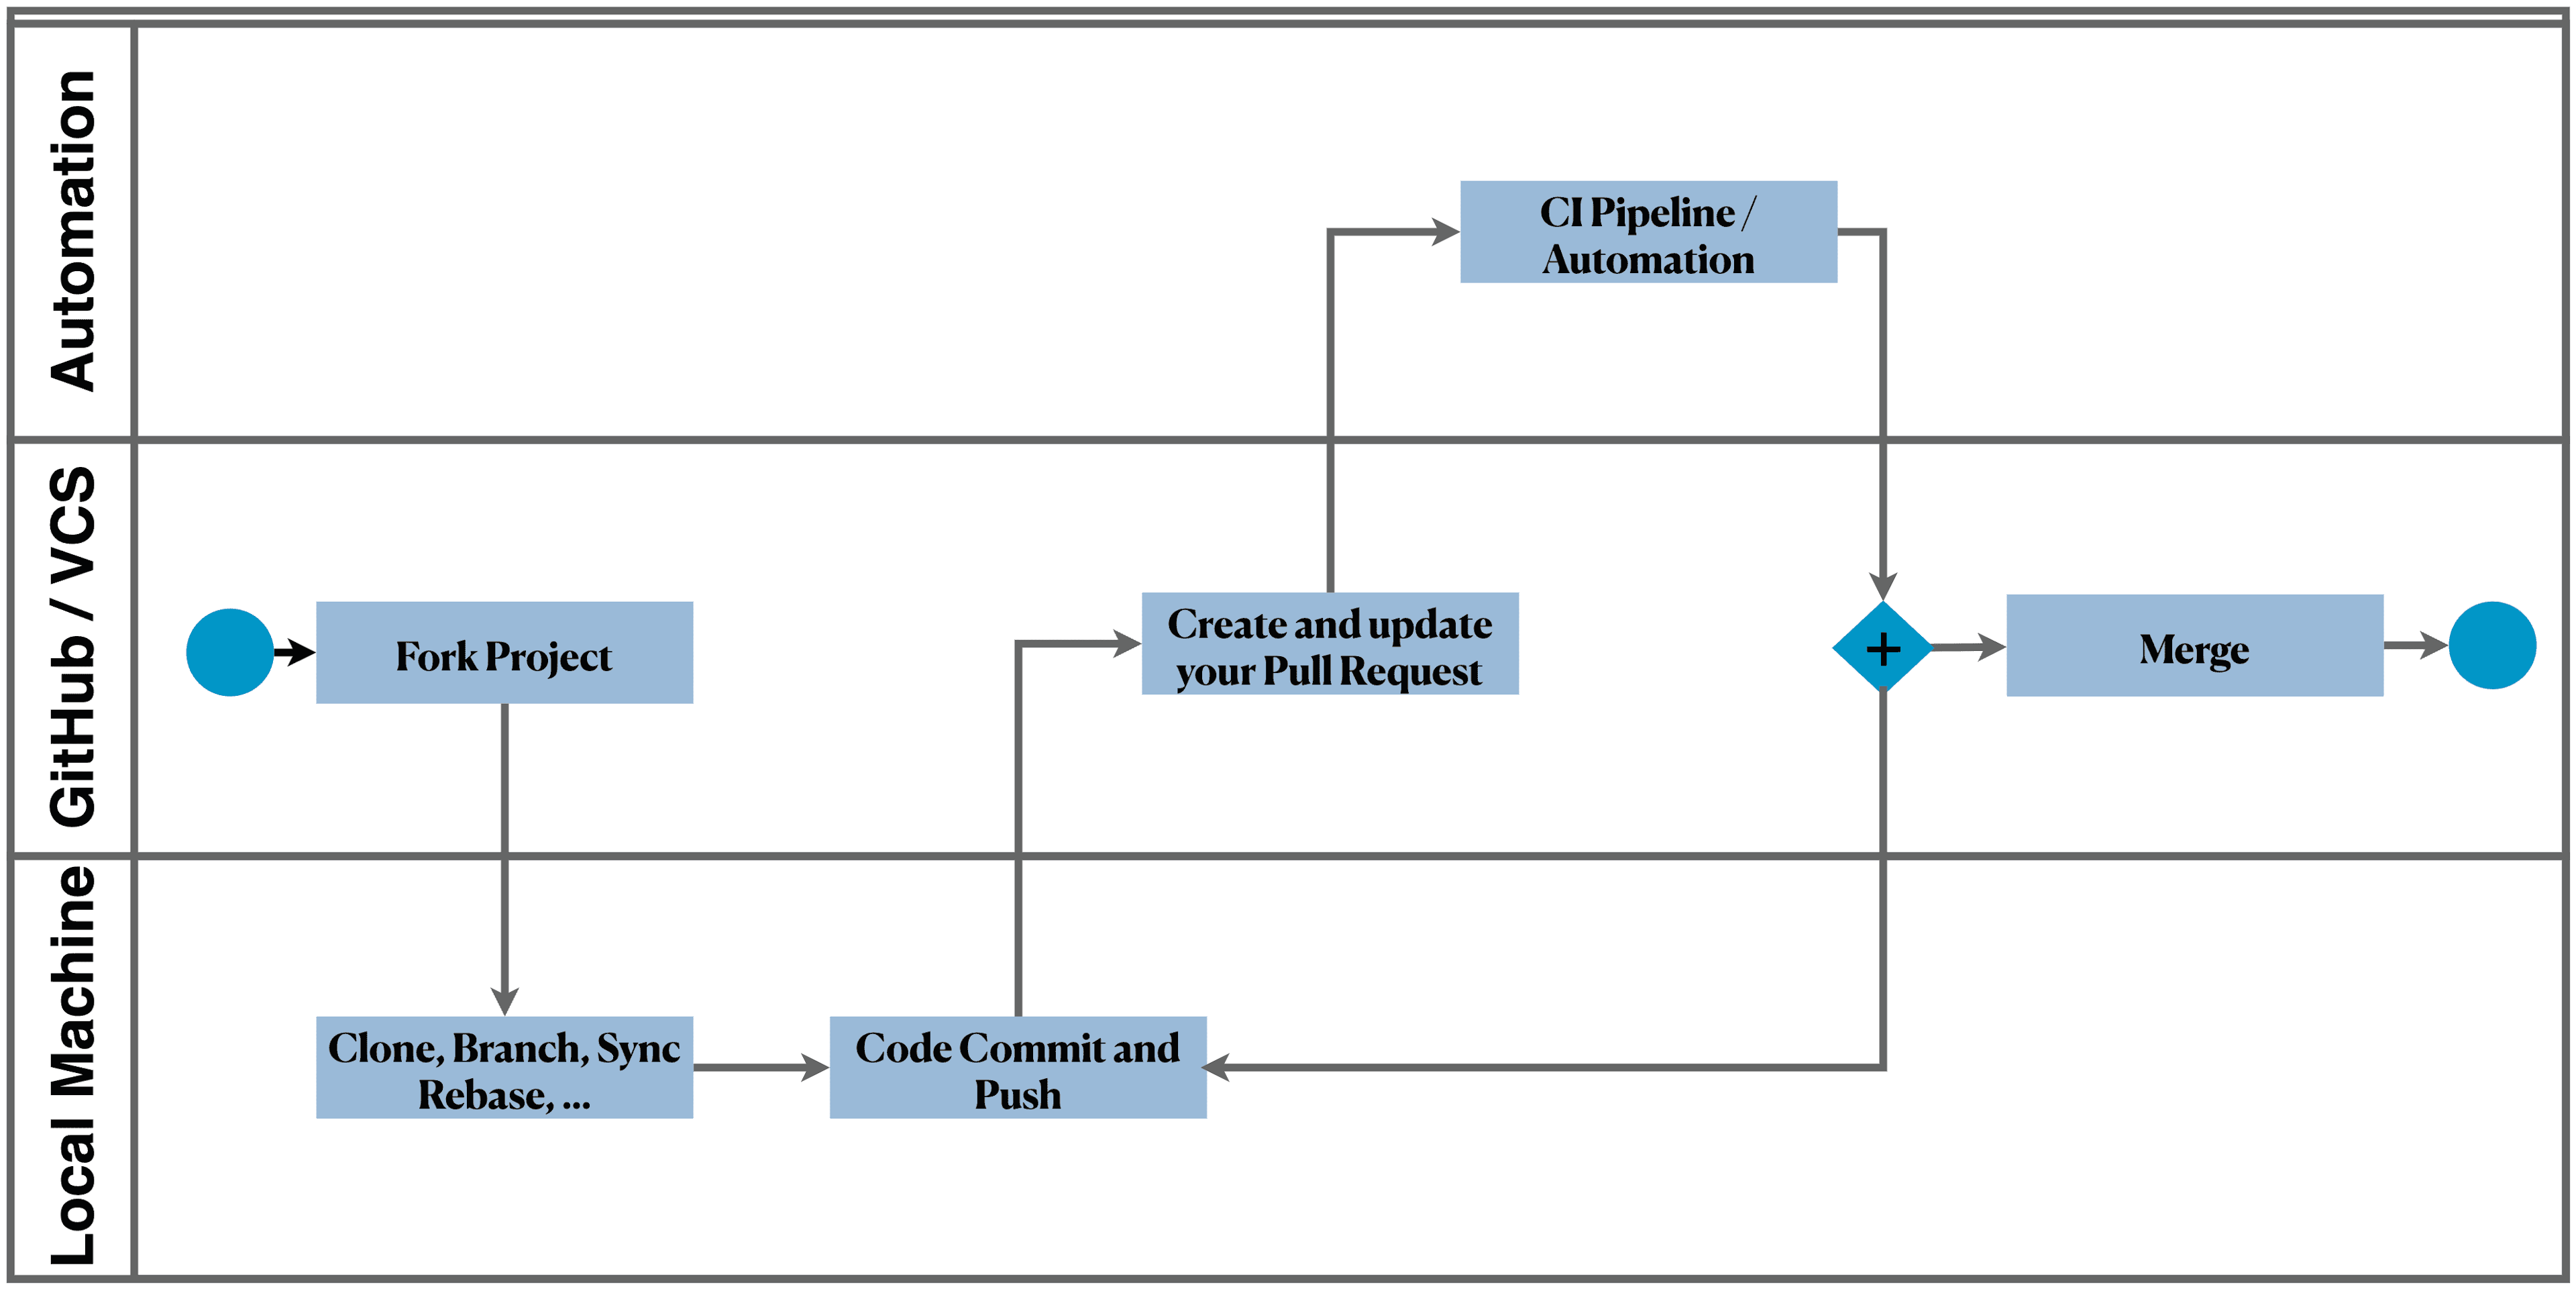
The diagram above shows a BPMN diagram which includes three swim lanes. The starting point would be in the GitHub swim lane at the single circle on the left.
- Fork: First, visit the project you want to contribute to and fork the project under your personal space. The project should be listed under your repositories and, in the case of GitHub, accessible at
github.com/<user>/<project-name>. You can now make any changes to the forked repository; it is your personal copy of the open source project. We will use this copy to prepare changes that we want to contribute to the main open source project. - Prepare: After your forked project is available, clone the repository to your local machine
git clone ..., branch to a new branch that lists your changes withgit checkout -b <branch-name>. Its best practice to create a branch off from the main branch which enables you to work on multiple changes simultaneously by keeping the main branch in sync with the upstream open source project. If you are interested in branching strategies checkout Martin Fowler's article about "Patterns for Managing Source Code Branches". - Make your change: After your working tree is set up, you can start editing files and adding git commits with
git commit -m "<commit message>". Also consider signing your commits with a GPG key by adding the flag-sand adding yourself as the developer's certificate of origin (DCO) with-S. Remember to visit the project documentation to make sure you comply with the requirements that are defined. Sometimes it's also required to sign a contributor license agreement (CLA) before any contribution can be accepted. - Create a Pull Request: Create a pull request in GitHub by navigating to the open source project page. If you make changes to the source code, make sure you describe the changes in detail. If you're not sure how detailed you should be in describing the changes, look at closed PR's and check how many additional comments were needed to allow the changes; this might give you an idea of how to frame your pull request description.
- Pull Request Triaging: We'll take a closer look at pull request triaging in the next chapter; essentially, after opening a pull request, open source project owners need to decide if the changes to your contribution are good to be merged or if changes are needed.
- Update Pull Request: If your changes have not been approved and changes have been requested, you must act and push a commit to address the requests.
- Merging: By merging your changes with the upstream open source project, you finalise the contribution and you can see your changes in the commit history of the open source project. Congratulations!
Changes to open source projects can take days, weeks, and sometimes months. Again, this depends on your contribution and how active the owners of the open source project is. If you are correcting a minor spelling error, reviewing your changes is straightforward and should not take too much time. If you make a change that affects all types of documents, the review process becomes more difficult and will likely take more time. Remember to make small incremental changes whenever possible, which always speeds up the process of triaging pull requests. If your changes are important or critical to the project, be aware that it may take time, project owners are not immediately available for every new PR but are always going about other activities. But with goodwill and friendly pings, you'll probably move the pull request along faster.
That’s it! If you like to reach out, you do so over Slack on the Kubernetes Server, the CNCF Server or on Twitter.